kubernetes 101
a basic introduction to kubernetes and it's components
a basic introduction to kubernetes and it's components
a set of nodes that run containerd applications.
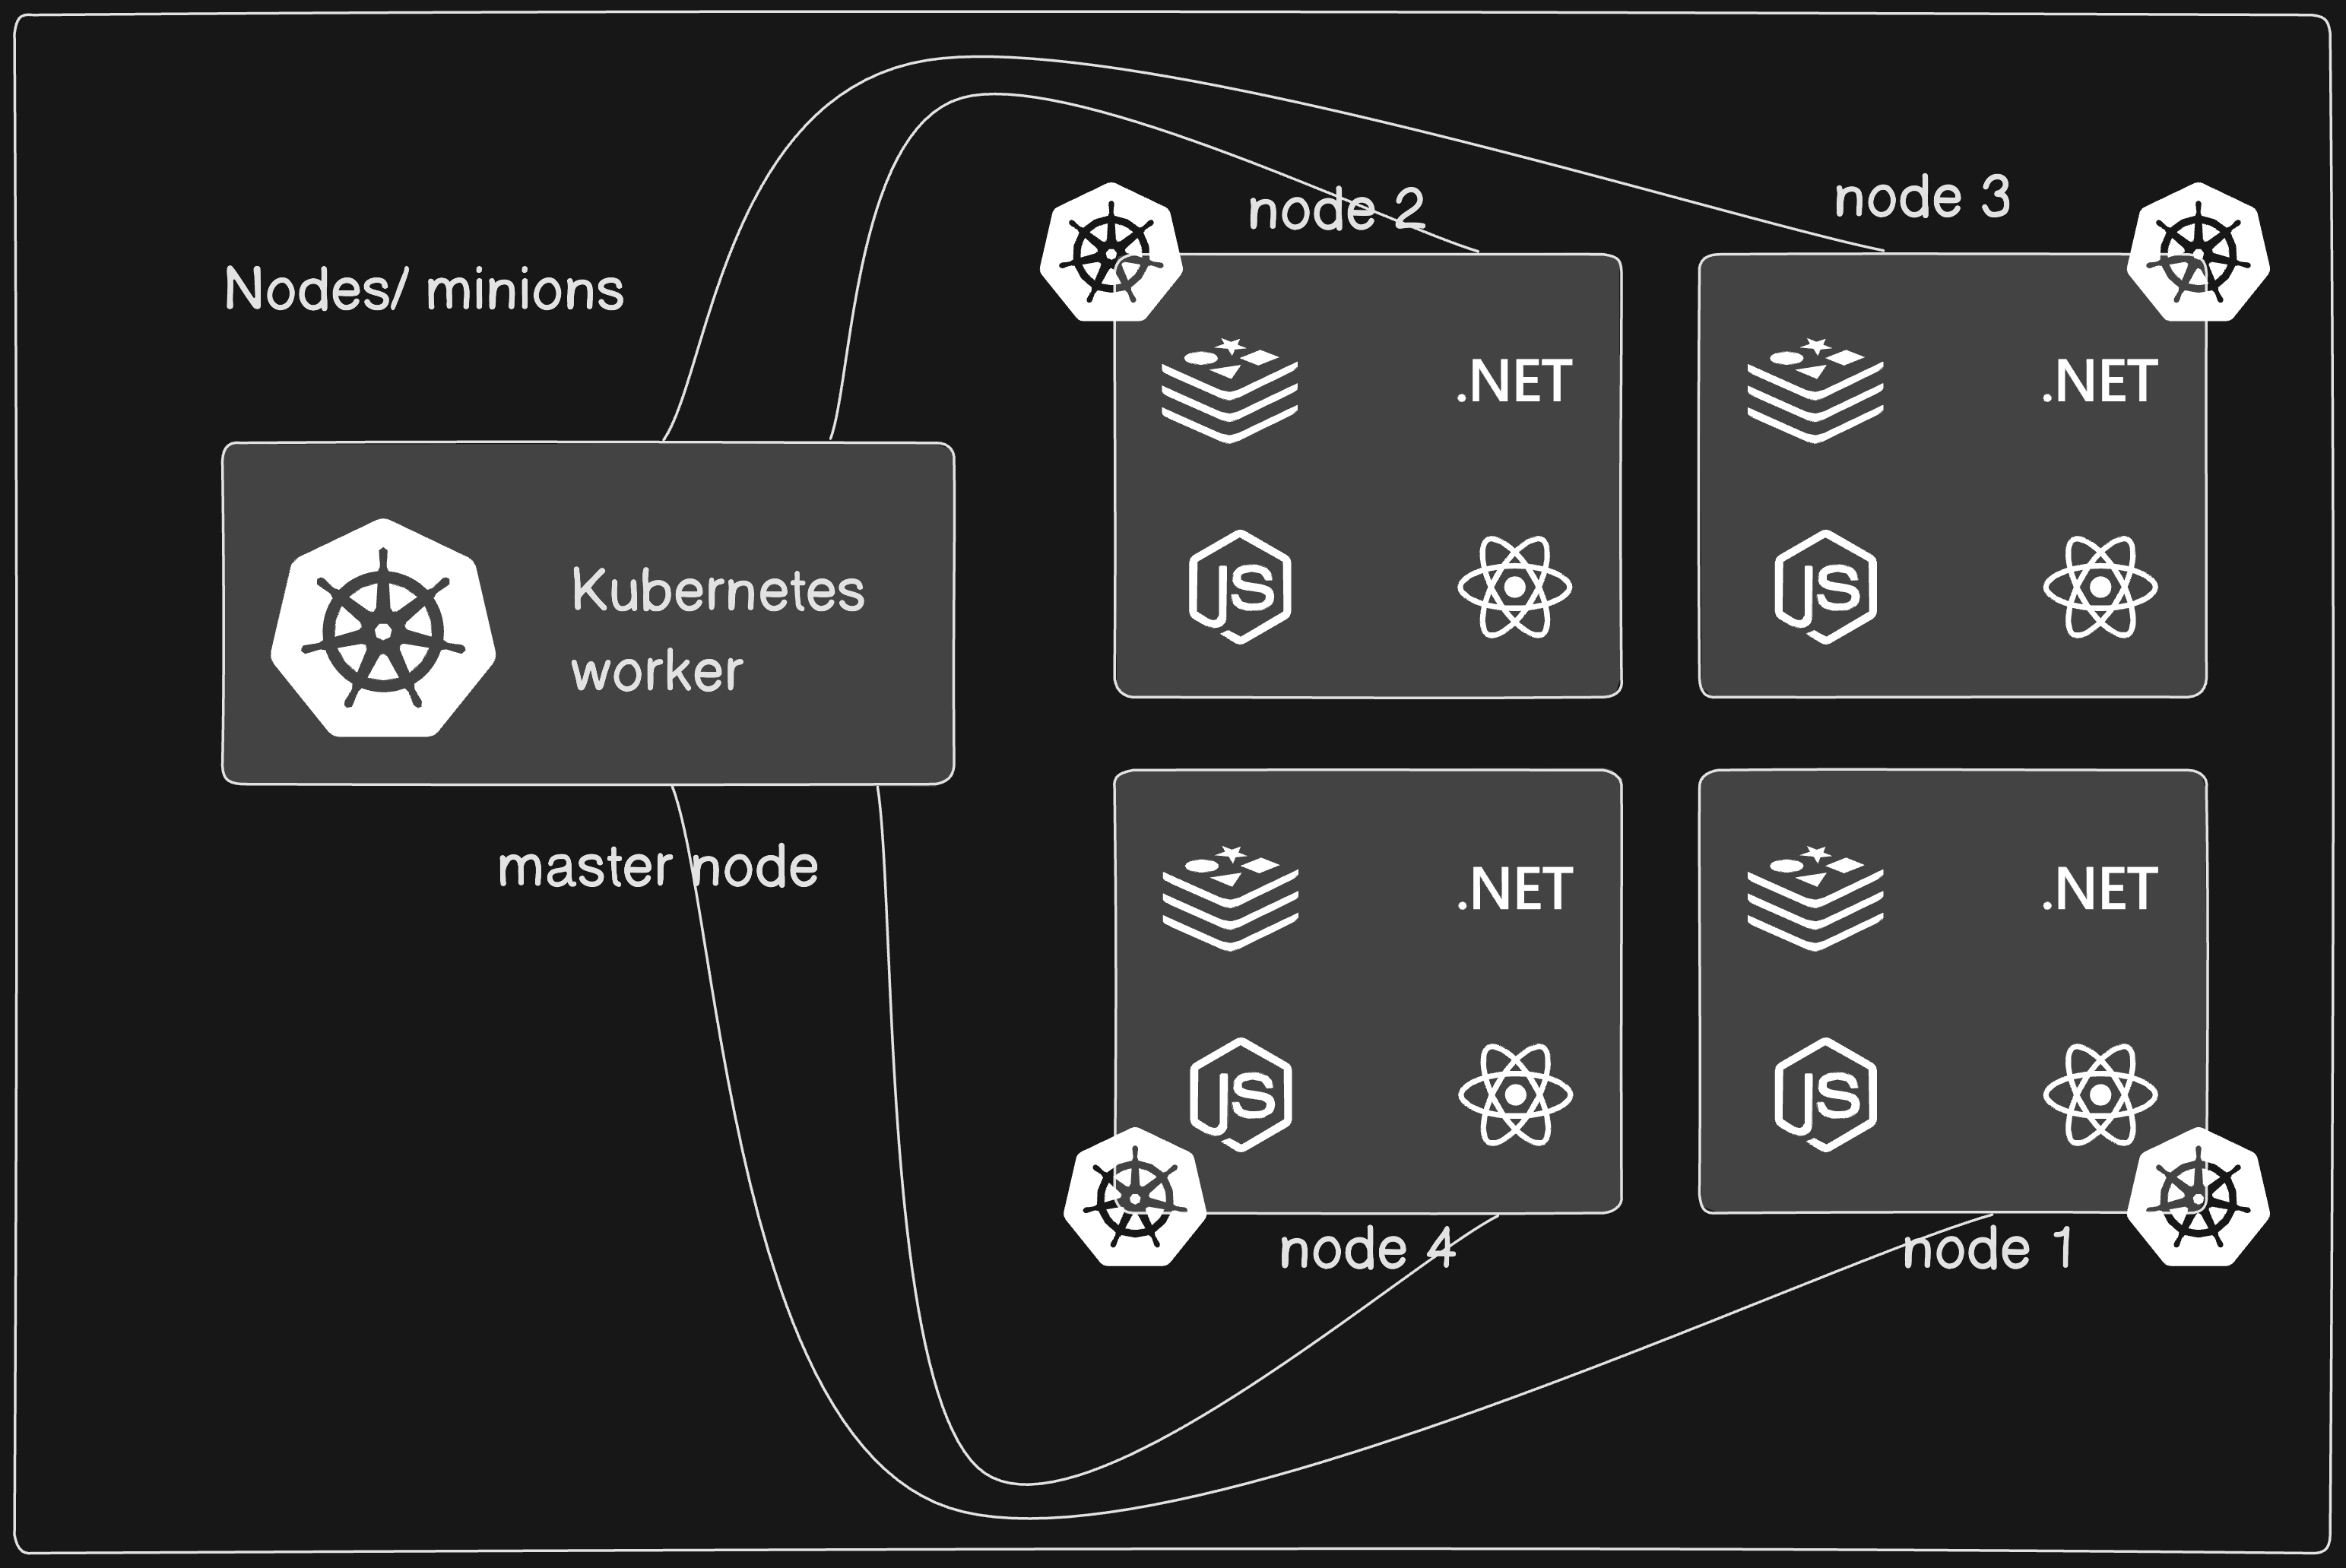
it is comprised of one master node and a number of worker nodes. the nodes can either be physical computers or virtual machines, dpeending on the cluster.
the master node is the origin of all tasks and controls the state of the cluster. it coordinates processes such as:
there must be minimum of one master node and one worker node for a Kubernetes cluster to be operational.
an interface to all Kubernetes resources.

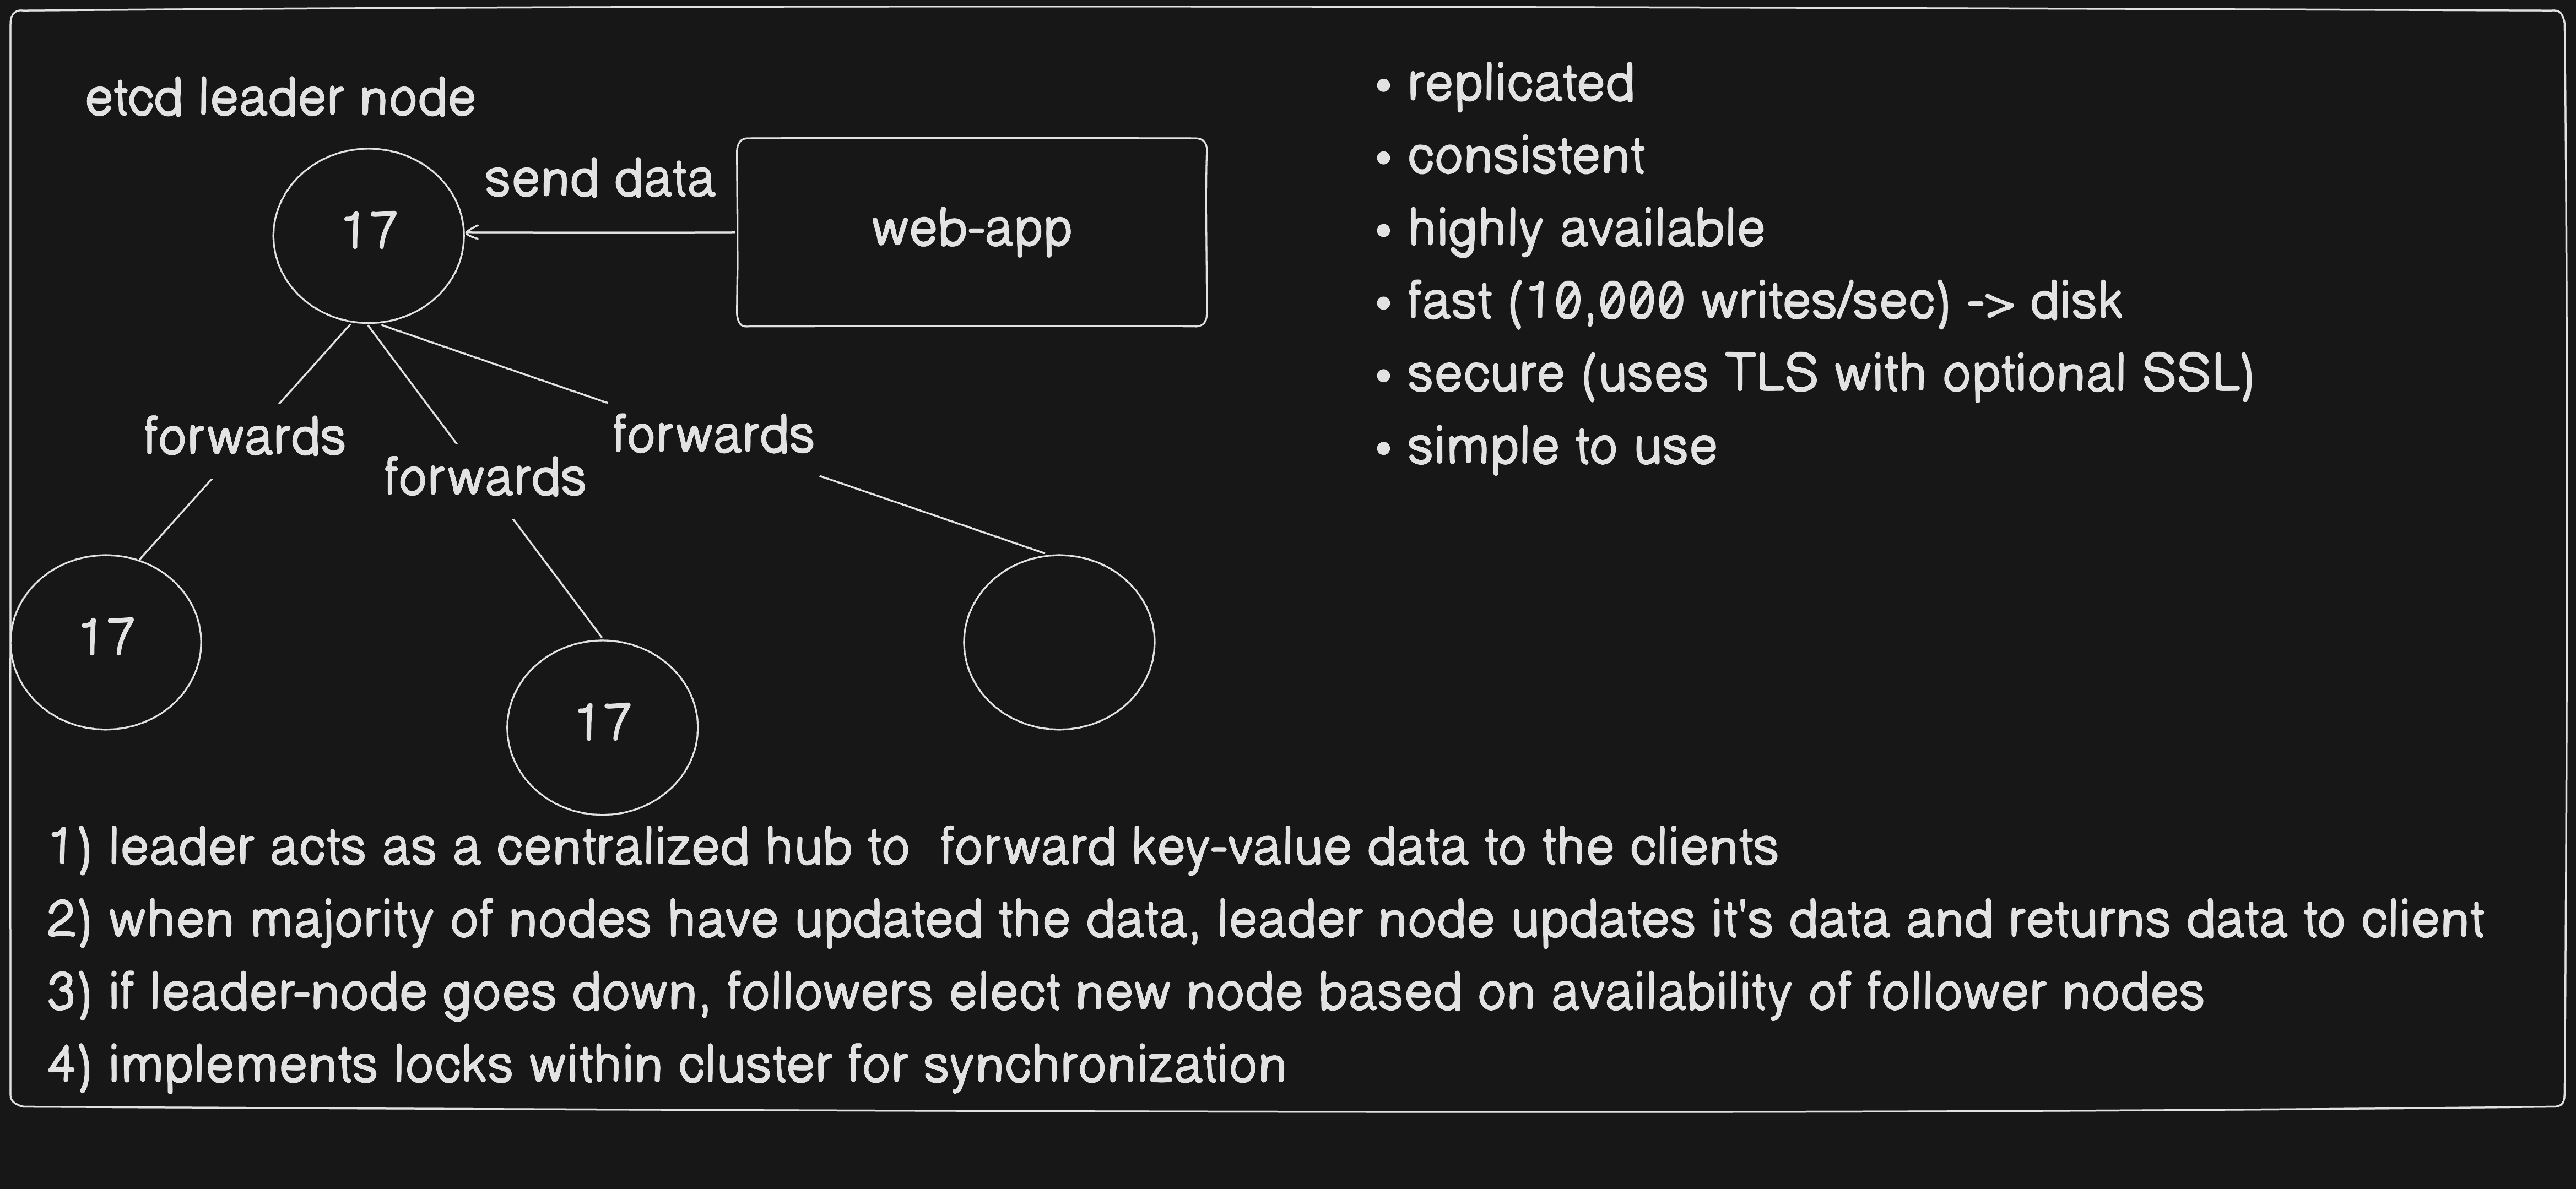
distributed key-value store
It’s a primary cli tool to deploy & manage applications in kubernetes clusters
a. Create a pod
kubectl run nginx --image nginx
## This will create a pod name nginx pulling image from the nginx:latest from dockerhub.pod.yamlapiVersion: v1
kind: Pod
metadata:
name: myapp-pod
labels:
app: myapp
spec:
containers:
- name: nginx-container
image: nginxto create create our resources using this YAML file, we can simply using the command:
kubectl create -f pod-definition.yaml or
kubectl apply -f pod.yaml
b. Show a list of pods
kubectl get podsc. Show a detailed list of pods
kubectl get pods -o wided. Describe pods
kubectl descrive pod [my-pod]e. Delete a pod
kubectl delete pod [my-pod]updated version of Replication Controller.
helps to run multiple instances of a single pod in a cluster. (high availability)
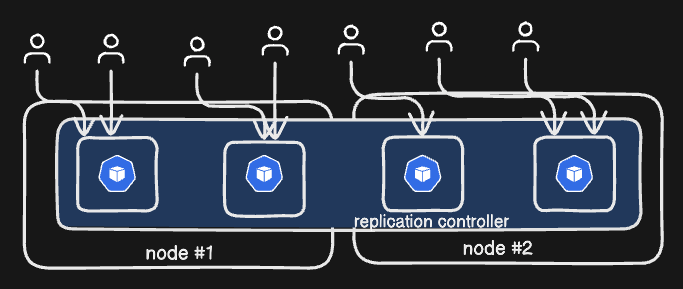
uses:
high availability: ensures specified number of pods are running at all the times. it can automatically build a new pod when the existing one fails on the kubernetes controller.
load balancing & scaling: create multiple pods to share loads among them suppose we have a cluster with a single pod. suddenly, if the demand increases and if we were to run out of resources, we could deploy additional pods within the same node or different node in a cluster. (spans multiple nodes on a cluster)
a. Create a replication controller
replication-controller.yaml
apiVersion: v1
kind: ReplicationController
metadata:
    name: my-rc
    labels:
        app: myapp
        type: frontend

spec:
    template:
        # pod-definition
        metadata:
            name: myapp-pod
            labels:
                app: myapp
                type: frontend-pod
        spec:
            containers:
                - name: nginx-container
                  image: nginx
    replicas: 3
let’s load our definition template: kubectl create -f replication-controller.yaml
b. get replicaiton controllers
kubectl get replicationcontroller
we can also look into our pods using the command kubectl get pods. you’ll see that there are 3 new pods with the name my-rc-XXXXX where XXXXX is added to uniquely identify the pods within the replication controller my-rc.
a. Create a replicaset
replicaset.yaml
apiVersion: apps/v1
kind: ReplicaSet
metadata:
  name: myapp-replicaset
  labels:
    app: myapp
    type: frontend
spec:
  template:
    metadata:
      name: myapp-pod
      labels:
        app: myapp
        type: frontpod
    spec:
      containers:
        - name: nginx-container
          image: nginx
  replicas: 3
    # ++
  selector:
    matchLabels:
      type: frontpod
    # ++
Compared to ReplicationController, we have new field called selector. This is used to identify the pods based on the labels provided within matchLabels.
Now, even if our pods are deployed ahead of replicaset, our replicaset won’t replace the pods that were created before it, but will check if we have required pods, and only create if necessariy.
b. Scaling our pods
replicas: 6kubectl replace -f replicaset.yamlkubectl scale --replicas=6 -f replicaset.yamlkubectl scale --replicas=6 replicaset myapp-replicasetc. Editing
You can edit your replicasets by using the command kubectl edit replicaset new-replica-set and restarting the pods.
let’s assume you deploy a simple webapplication. some of the scenarios you might think about:
pause -> make changes -> resume.this is where kubernetes deployments comes into action. it provides us with the capability to:
let’s create a simple deployment config
deployment.yaml
apiVersion: apps/v1
# ++++
kind: Deployment
# ++++
metadata:
    name: myapp-deployment
    labels:
        app: myapp
        type: frontend
spec:
    template:
        metadata:
            name: myapp-pod
            labels:
                app: myapp
                type: frontend
        spec:
            containers:
                - name: nginx-container
                  image: nginx
replicas: 3
selector:
    matchLabels:
        type: frontend
now, running kubectl create -f deployment.yaml will create our deployment, which will create our replicaset, which will create our pods.
kubectl get deployments #get deployments
kubectl get replicaset #get replicasets
kubectl get pods #get pods
tip: to get all our kubernetes objects, we can use the command kubectl get all
creating/updating deployments triggers a rollout.
a new rollout creates a new deployment revision. In future, if the application is updated,
a new rollout is triggered and a new deployment revision is created.
this helps us keep track of the changes made in our deployment, and enables us to rollback to previous deployment version.
to view the status of the rollout kubectl rollout status deployment/deployment-1
if you want to update your deployment, you have two options:
downtime(where application isn’t usable) between the deploymentsuppose you want to update your current deployment, this is how you do a simple deployment:
deployment-definition.yaml configkubectl apply -f deployment-definition.yamlor, you can
kubectl set image deployment/myapp-deployment nginx-container=nginx:1.9.1
but, it won’t affect the deployment configuration file, so be mindful of that.kubectl create -f deployment.yaml
(adding --record saves changes within rollout history)kubectl get deploymentskubectl apply -f deployment.yamlkubectl set image deployment/myapp-deployment nginx=nginx:1.9.1kubectl edit deployment myapp-deployment --recordcreating deployment -> creates a rollout -> creates a new deployment revision
status:
kubectl rollout status deployment/myapp-deploymentkubectl rollout history deployment/myapp-deployment this will show the revisions with REVISION Numberrollback: kubectl rollout undo deployment/myapp-deployment rollbacks to last revision
under the hood: upon deployment through rollout,
kubernetes provides a way to virtually organize resources using namespaces.
by default, kubernetes consists of these namespaces:
we can view available namespaces in the system using kubectl get namespaces
ResourceQuotaapiVersion: v1
kind: ResourceQuota
metadata:
name: compute-quota
namespace: dev
spec:
hard:
pods: "10"
requests.cpu: "4"
requests.memory: 5Gi
limits.cpu: "10"
limits.memory: 10Gi

pg-svc: service name is pg-svc
dev: within the namespace `dev`
svc: it's a type of service
cluster.local: domaincreating namespace:
kubectl create namespace my-namespaceapiVersion: v1
kind: Namespace
metadata:
name: devspecifiying namespace:
withkubectl command: add --namespace=dev or --namespace dev at the end of command to direct kubectl to direct the action within the given namespace dev.
example:
kubectl config set-contenxt $(kubectl config current-context) --namespace=dev
kubectl get pods // this will show pods from dev namespace nowwithin config:
apiVersion: v1
kind: Pod
metadata:
  name: app-pod
  namespace: dev
  labels:
    app: app
    type: backend
spec:
  containers:
    - name: nginx
      image: nginx
view all resources regardless of any namespace: add --all-namespaces or -A to view resources within all namespaces. for instance, we can get all pods from all available namespaces using the command kubectl get pods -A
replacing an existing environment with a TEMP_CONFIGURATION.yaml can be done using:
kubectl replace --force -f /tmp/TEMP_CONFIGURATION.yaml. this will delete the existing configuration and update it with the updated configuration if exists in the environment.
when a pod is created, it is in pending state. in this stage, the scheduler tries to place the pod in a node. if the scheduler can’t find a place in the node, it remains in the pending state.
we can run the command kubectl describe pod POD_NAME to see if the pod remains in the pending state.
once the pod is scheduled, it goes into ContainerCreating status.
in this stage, the images required for the applications are pulled and container starts.
once the container starts, it goes into running state. the pod will remain in the running status until the program is completed or terminated.
to check the status of the pods, we can use pod conditions.